Irresistible Pumpkin Patch Dirt Cups Recipe
If you’re on the hunt for a festive treat that’s playful, delicious, and downright fun to make, these Irresistible Pumpkin Patch Dirt Cups are exactly what you need. Combining rich chocolatey flavors, creamy pudding, and the nostalgic crunch of cookie “dirt,” this dessert brings the perfect touch of autumn magic to any gathering. With adorable candy pumpkins nestled on top and optional green “vines” that really set the scene, these dirt cups capture the spirit and taste of the season in one delightful cup.
Ingredients You’ll Need
Gathering simple, well-chosen ingredients is the key to creating those Irresistible Pumpkin Patch Dirt Cups. Each item plays a distinct role—from the crunchy texture of the chocolate sandwich cookies to the smooth, fluffy pudding base, and the seasonal charm of candy pumpkins, every piece comes together beautifully to make this dessert shine.
- Chocolate sandwich cookies (15.25 oz package): Crushed to create the perfect “dirt” texture and add that classic chocolate flavor.
- Instant chocolate pudding mix (3.9 oz box): Provides the creamy, rich filling that balances sweetness and decadence.
- Cold milk (2 cups): Essential to whisk the pudding mix into a smooth consistency.
- Whipped topping (8 oz tub, thawed): Folded into the pudding for a light, fluffy texture that feels indulgent without being heavy.
- Candy pumpkins (12–16 pieces): These add the perfect pop of festive color and a bit of fun to the presentation.
- Green candy melts, sprinkles, or licorice (optional): Great for creating vines to make your pumpkin patch come alive.
- Clear plastic cups (8–9 oz size): Ideal for layering and allowing everyone to admire the beautiful dirt cup details.
How to Make Irresistible Pumpkin Patch Dirt Cups
Step 1: Crush the Cookies
The foundation of your pumpkin patch starts with finely crushed chocolate sandwich cookies. I love using either a food processor or a simple zip-top bag and rolling pin for this part — it’s satisfying to see the crumbs form and know they’re going to deliver that authentic “dirt” texture. Don’t forget to set aside about two tablespoons of these crumbs for the topping; that final sprinkle really brings it all together.
Step 2: Prepare the Pudding
Whisk the instant chocolate pudding mix with cold milk vigorously for 2 minutes until it thickens nicely. Patience is key here — letting it sit for an additional 5 minutes helps it set perfectly so the filling has that luscious, firm-but-creamy consistency that’s simply irresistible in your Pumpkin Patch Dirt Cups.
Step 3: Fold in the Whipped Topping
This step is where the magic turns into fluffy goodness. Gently fold the thawed whipped topping into the pudding mix until you have a smooth and airy blend. This not only lightens the pudding’s texture but also adds a dreamy richness that elevates the whole dessert.
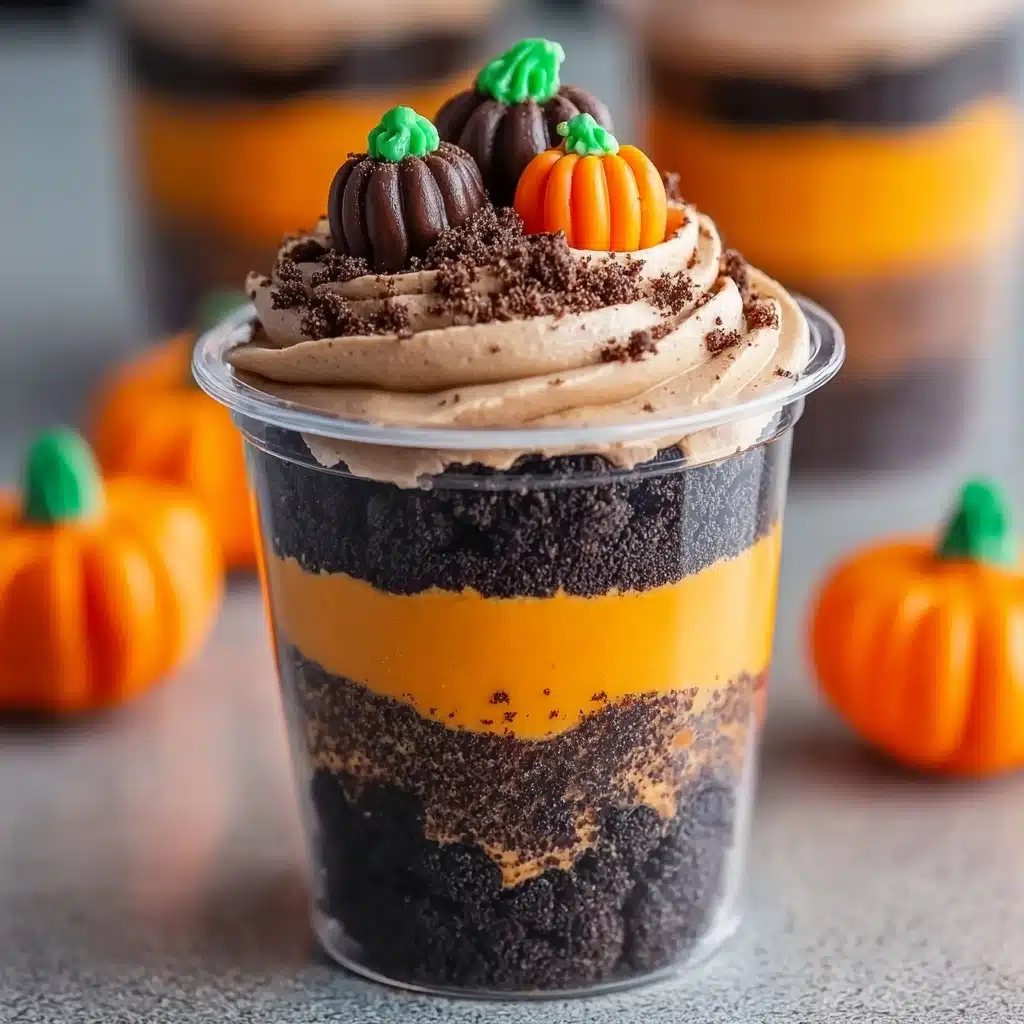
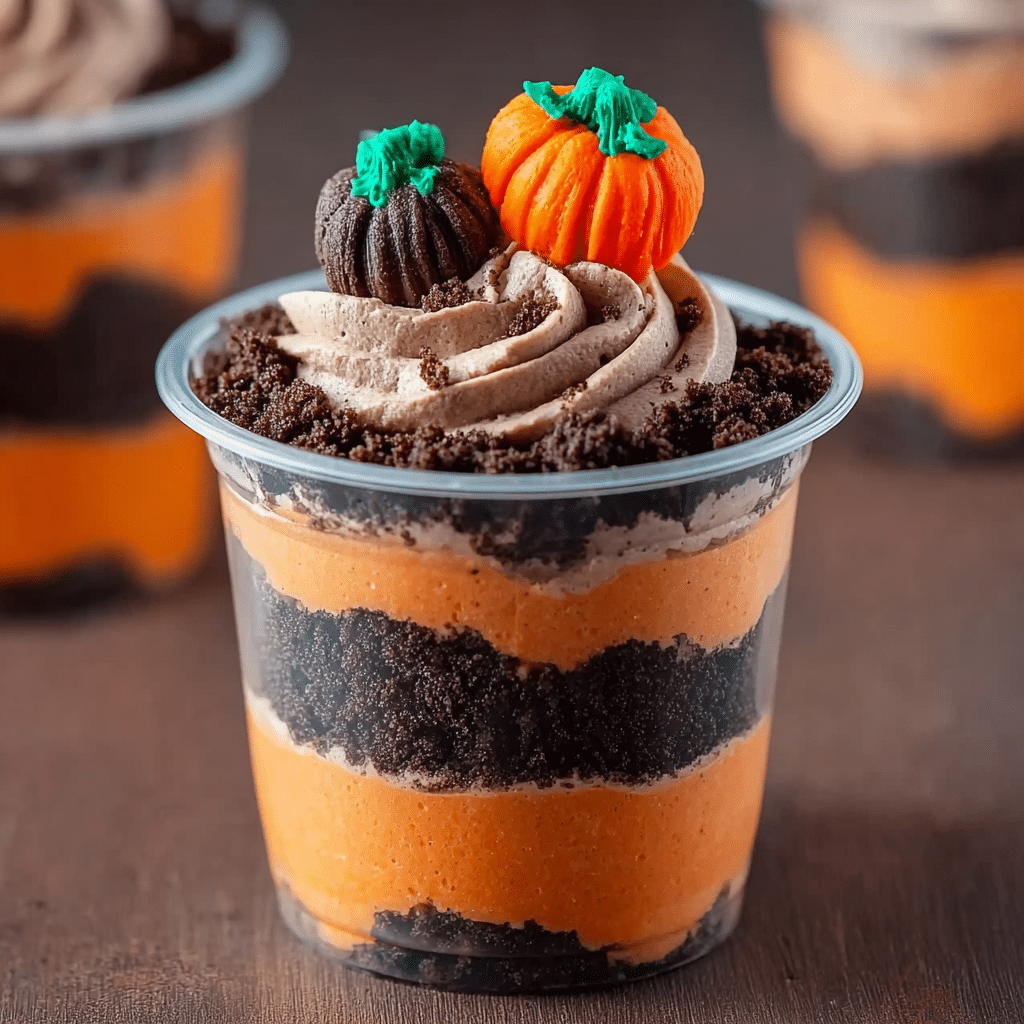
Step 4: Layer the Cups
Now comes the fun part — building your little dirt cups. Start by spooning a layer of cookie crumbs into the bottom of each plastic cup. Then add a generous spoonful of the pudding mixture on top, followed by another layer of cookie crumbs. Repeat until the cup is almost full, finishing with a nice mound of cookie “dirt” on top. This layering creates a feast for both the eyes and taste buds.
Step 5: Decorate the Pumpkin Patch
Place candy pumpkins on the surface, pressing them gently into the “dirt.” If you want to get creative, use green candy melts, sprinkles, or thin strips of licorice to craft little vines twisting around your pumpkins, bringing the patch to life with a whimsical touch.
Step 6: Chill and Serve
Pop your assembled cups in the refrigerator for at least 30 minutes before serving. This chilling step lets all the flavors meld together beautifully so every bite of these Irresistible Pumpkin Patch Dirt Cups is as delicious as you imagined. They are best enjoyed within two days to keep everything fresh and delightful.
How to Serve Irresistible Pumpkin Patch Dirt Cups
Garnishes
Beyond the candy pumpkins and green vines, you can jazz up your dirt cups with a dollop of extra whipped topping or a sprinkle of mini chocolate chips to amp up the chocolate factor. Edible glitter or gold sugar crystals make a sparkly addition for parties and gatherings.
Side Dishes
Pair these indulgent dirt cups with light, crisp apple slices or a fresh autumn fruit salad to balance out the richness and keep the seasonal vibes flowing. A cup of warm spiced cider or a cozy chai latte also complements this dessert perfectly.
Creative Ways to Present
Serve your dirt cups in mason jars for a rustic feel or line them up on a wooden tray for a charming, farmhouse-style dessert display. You can even insert small decorative garden tools or craft sticks with fun Halloween or fall-themed messages for a festive twist.
Make Ahead and Storage
Storing Leftovers
If you happen to have any leftovers (which is rare!), cover them tightly with plastic wrap and store in the refrigerator. They’ll stay fresh and tasty for up to two days, maintaining the perfect balance of creamy pudding and crunchy cookie crumbs.
Freezing
Because of the whipped topping texture and pudding base, freezing Irresistible Pumpkin Patch Dirt Cups is not recommended. The texture may separate and become watery when thawed, which would take away from the delightful experience of this dessert.
Reheating
These dirt cups are best enjoyed cold and do not require reheating. Serving them chilled keeps the layers intact and the flavors refreshingly balanced, so just grab a spoon and dig in straight from the fridge.
FAQs
Can I use a different type of cookie for the dirt?
Absolutely! While chocolate sandwich cookies are classic and perfect for that rich dirt look, crushed chocolate graham crackers or Oreo Thins also work wonderfully. Just make sure they’re crushed finely to keep the texture consistent.
What if I don’t have instant pudding mix?
If instant pudding isn’t on hand, you can make a homemade chocolate pudding from scratch. Just be sure it’s firm enough to hold its shape when layered, and let it cool completely before folding in the whipped topping.
Can I make these dirt cups vegan or dairy-free?
Yes! Use dairy-free whipped topping and plant-based milk like almond or oat milk, and choose a dairy-free chocolate pudding or make your own vegan pudding. The cookie base may require checking ingredients to ensure it’s vegan-friendly.
How far in advance can I prepare these dirt cups?
These cups are best assembled the same day or the day before serving. Preparing them a day ahead allows the flavors to meld but avoid making them more than 24 hours in advance for the best texture and flavor.
What’s the best way to crush cookies without a food processor?
Place cookies in a large sealable plastic bag and use a rolling pin or even a heavy bottle to crush them. Roll or press firmly until you get the desired crumb size, and you’re good to go—no fancy equipment required!
Final Thoughts
Nothing beats sharing the joy of a simple, festive dessert with loved ones, and these Irresistible Pumpkin Patch Dirt Cups are just the ticket. They bring smiles with every layer, easy prep with crowd-pleasing results, and that unmistakable cozy feeling of fall. I can’t wait for you to try making these and watch how quickly they disappear from the table!
PrintIrresistible Pumpkin Patch Dirt Cups Recipe

Delightfully festive and easy-to-make Pumpkin Patch Dirt Cups combine layers of chocolate cookie crumbs and creamy chocolate pudding topped with candy pumpkins, perfect for Halloween or autumn gatherings.
- Prep Time: 10 minutes
- Cook Time: 0 minutes
- Total Time: 40 minutes
- Yield: 8 servings 1x
- Category: Dessert
- Method: No-Bake, Assembly
- Cuisine: American
- Diet: Vegetarian
Ingredients
Crust & Topping
- 1 package (15.25 oz) chocolate sandwich cookies (24–28 cookies)
- 2 tablespoons reserved cookie crumbs (from above)
Pudding Filling
- 1 box (3.9 oz) instant chocolate pudding mix
- 2 cups cold milk
- 1 tub (8 oz) whipped topping, thawed
Decoration
- 12–16 candy pumpkins
- Green candy melts, sprinkles, or licorice (optional for “vines”)
Serving
- Clear plastic cups (8–9 oz size)
Instructions
- Crush the cookies: Using a food processor or placing the cookies in a zip-top bag, crush them with a rolling pin until you achieve fine crumbs. Set aside 2 tablespoons of these crumbs for garnishing later.
- Make the pudding: In a medium bowl, whisk together the instant chocolate pudding mix and cold milk vigorously for about 2 minutes until the mixture starts to thicken. Let it sit for 5 minutes to fully set.
- Fold in whipped topping: Gently fold the thawed whipped topping into the set pudding mixture using a spatula, combining until the texture is smooth and fluffy without deflating the topping.
- Layer the cups: Spoon a layer of chocolate cookie crumbs into the bottom of each clear plastic cup. Then add a layer of the chocolate pudding mixture on top. Repeat the layering process until the cups are almost full, finishing with a layer of the cookie crumbs on top to resemble dirt.
- Decorate: Press candy pumpkins onto the top ‘dirt’ layer of each cup. Optionally, create ‘vines’ by decorating with green candy melts, sprinkles, or licorice around the pumpkins.
- Chill and serve: Refrigerate the prepared cups for at least 30 minutes before serving to let the layers set. For best taste and freshness, enjoy within 2 days.
Notes
- You can crush the cookies by hand if a food processor is not available, but aim for fine crumbs for the best texture.
- Make sure the whipped topping is fully thawed and cold to easily fold into the pudding without deflating.
- Use clear plastic cups to showcase the layered look, adding to the fun presentation.
- For a vegan or dairy-free variation, substitute with dairy-free pudding mix and coconut whipped topping.
- Prepare these cups a few hours ahead to allow flavors to meld, but avoid making them more than 2 days in advance to maintain freshness.
Nutrition
- Serving Size: 1 cup (approx. 8 oz)
- Calories: 270
- Sugar: 23g
- Sodium: 160mg
- Fat: 13g
- Saturated Fat: 7g
- Unsaturated Fat: 5g
- Trans Fat: 0g
- Carbohydrates: 35g
- Fiber: 2g
- Protein: 3g
- Cholesterol: 15mg
Keywords: Pumpkin Patch Dirt Cups, Halloween dessert, no-bake pudding cups, chocolate dessert, kid-friendly treats