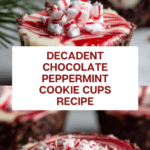
Chocolate Peppermint Cookie Cups Recipe
Introduction
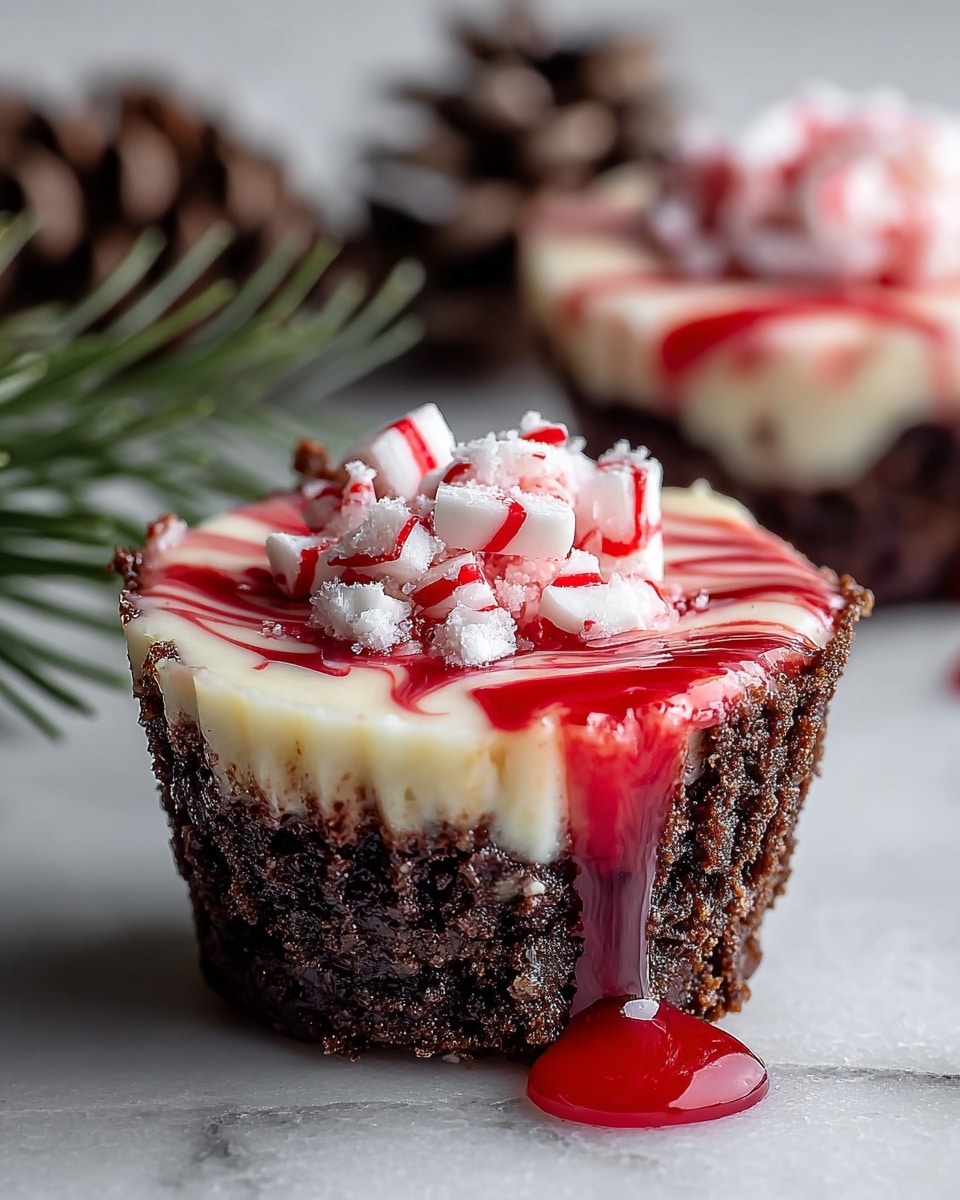
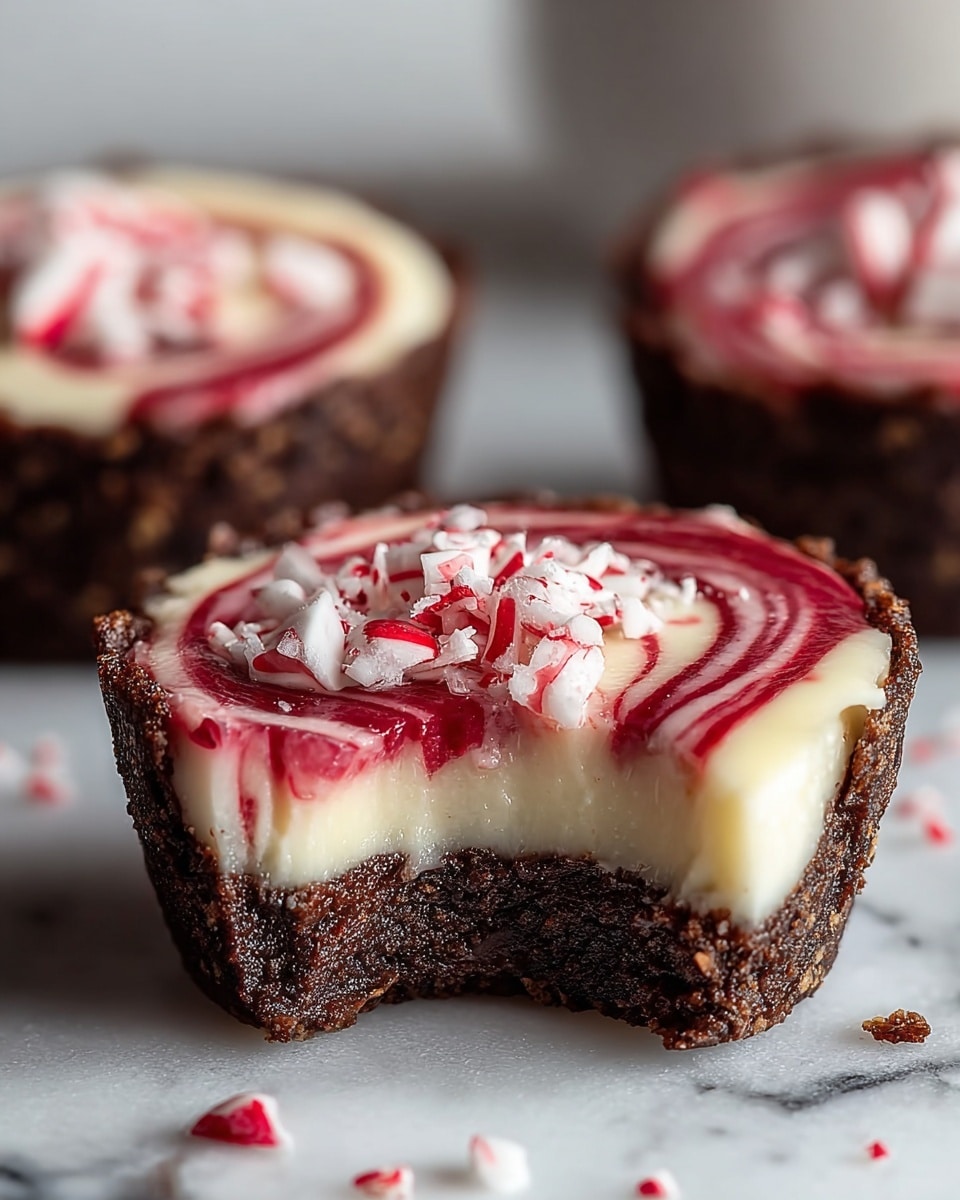
These Chocolate Peppermint Cookie Cups combine rich cocoa flavors with a creamy peppermint cheesecake filling. Perfect for the holidays or any time you crave a festive, indulgent treat.
Ingredients
- 2 cups all-purpose flour
- 1/4 cup Dutch-processed cocoa powder (sifted)
- 1/4 cup black cocoa powder
- 1 tsp baking soda
- 1/2 tsp salt
- 1 cup unsalted butter (room temperature)
- 1/2 cup granulated sugar
- 1 cup light brown sugar (packed)
- 2 large eggs (room temperature)
- 1 tsp vanilla extract
- 1 cup heavy whipping cream (chilled)
- 8 oz cream cheese (full fat)
- 1/2 cup granulated sugar
- 1 tsp peppermint extract
- Red color gel (for piping bag decoration)
- Candy canes (chopped, for garnish)
Instructions
- Step 1: Preheat your oven to 350°F (175°C). Spray two regular-sized cupcake tins thoroughly with cooking spray to prevent sticking.
- Step 2: In a medium bowl, whisk together the flour, Dutch-processed cocoa powder, black cocoa powder, baking soda, and salt. Set aside.
- Step 3: In a large mixing bowl, beat the butter, granulated sugar, and brown sugar on medium-high speed until light and fluffy, about 2 to 3 minutes.
- Step 4: Reduce mixer speed to low, add eggs one at a time, then the vanilla extract, beating until fully incorporated.
- Step 5: Gradually add the flour mixture to the butter mixture, mixing only until just combined. Do not overmix.
- Step 6: Using a large cookie scoop or about 3 tablespoons, portion the dough evenly into the prepared muffin tins.
- Step 7: Bake for 10 to 13 minutes, until mostly set but still soft in the centers.
- Step 8: Immediately after baking, press down firmly into the center of each cookie cup with a small jar or container to create a well for the filling.
- Step 9: Let the cookie cups cool in the pans for 10 minutes, gently twist to loosen, then continue cooling for 5 more minutes. Transfer to a wire rack to cool completely.
- Step 10: In a cold bowl, whip the chilled heavy cream until stiff peaks form.
- Step 11: In another bowl, beat cream cheese, granulated sugar, and peppermint extract until smooth and creamy.
- Step 12: Gently fold the whipped cream into the cream cheese mixture until fully combined.
- Step 13: Using a small food-safe paintbrush, paint two red stripes inside a piping bag fitted with a large round tip. Fill the bag with the peppermint cheesecake filling.
- Step 14: Pipe a generous swirl of filling into each cooled cookie cup.
- Step 15: Refrigerate the filled cookie cups for 1 to 2 hours until the filling is set.
- Step 16: Garnish with chopped candy canes before serving. Serve chilled or keep refrigerated.
Tips & Variations
- For extra peppermint flavor, add a few drops of peppermint extract to the cookie dough.
- Use crushed peppermint candies instead of candy canes for a different garnish texture.
- If you don’t have black cocoa powder, double the Dutch-processed cocoa for a similar effect.
- To make this recipe vegan, substitute butter with vegan margarine and use dairy-free cream cheese and whipping cream alternatives.
Storage
Store the cookie cups in an airtight container in the refrigerator for 2 to 3 days. For longer storage, freeze without the candy cane topping for up to 4 weeks. Thaw in the refrigerator before serving and add garnish fresh.
How to Serve
Serve this delicious recipe with your favorite sides.
FAQs
Can I make the cookie cups ahead of time?
Yes, you can bake the cookie cups a day ahead and store them in an airtight container. Wait to fill and garnish them just before serving for best texture.
What if I don’t have a piping bag?
You can use a resealable plastic bag with a small corner snipped off to pipe the cheesecake filling if you don’t have a piping bag.
PrintChocolate Peppermint Cookie Cups Recipe

Delight in these festive Chocolate Peppermint Cookie Cups, featuring rich cocoa cookie shells filled with a creamy peppermint cheesecake filling. Perfectly soft cookie cups are baked and then filled with a luscious blend of cream cheese, whipped cream, and peppermint extract. Garnished with crushed candy canes for a refreshing holiday crunch, these easy-to-make treats combine chocolate and mint in every bite.
- Prep Time: 20 minutes
- Cook Time: 13 minutes
- Total Time: 3 hours 33 minutes
- Yield: 24 cookie cups 1x
- Category: Dessert
- Method: Baking
- Cuisine: American
- Diet: Vegetarian
Ingredients
Cookie Cups
- 2 cups all-purpose flour
- 1/4 cup Dutch-processed cocoa powder (sifted)
- 1/4 cup black cocoa powder
- 1 tsp baking soda
- 1/2 tsp salt
- 1 cup unsalted butter (room temperature)
- 1/2 cup granulated sugar
- 1 cup light brown sugar (packed)
- 2 large eggs (room temperature)
- 1 tsp vanilla extract
Cheesecake Filling
- 1 cup heavy whipping cream (chilled)
- 8 oz cream cheese (full fat)
- 1/2 cup granulated sugar
- 1 tsp peppermint extract
Decoration
- Red color gel (for piping bag decoration)
- Candy canes (chopped, for garnish)
Instructions
- Preheat and Prepare Tins: Preheat your oven to 350°F (175°C). Thoroughly spray two regular-sized cupcake tins with cooking spray to prevent the cookies from sticking during baking.
- Mix Dry Ingredients: In a medium bowl, whisk together the all-purpose flour, Dutch-processed cocoa powder, black cocoa powder, baking soda, and salt. Set aside for later use.
- Cream Butter and Sugars: In a large mixing bowl, beat the unsalted butter, granulated sugar, and light brown sugar on medium-high speed until light, fluffy, and well combined, about 2 to 3 minutes.
- Add Eggs and Vanilla: Reduce mixer speed to low and add eggs one at a time, mixing each fully before adding the next. Stir in vanilla extract and beat until fully incorporated.
- Combine Dry and Wet Ingredients: Gradually add the flour mixture to the wet ingredients, mixing only until just combined to avoid overmixing.
- Scoop Dough: Using a large cookie scoop or approximately 3 tablespoons, evenly portion the cookie dough into the prepared muffin tins.
- Bake Cookies: Bake in the preheated oven for 10 to 13 minutes until mostly set but still soft in the centers.
- Create Wells in Cookies: Immediately upon removal from the oven, press down firmly in the center of each cookie cup with a small jar or container to create a well for filling.
- Cool Cookies: Let the cookie cups cool in the pans for 10 minutes. Gently twist each cup slightly to loosen, then allow to cool an additional 5 minutes before transferring to a wire rack to cool completely.
- Whip the Cream: Using a cold bowl and whisk, whip the chilled heavy cream until stiff peaks form, ensuring the cream is fully aerated and holds shape.
- Mix Cheesecake Base: In a separate bowl, beat the full-fat cream cheese, granulated sugar, and peppermint extract together until smooth and creamy.
- Fold in Whipped Cream: Gently fold the whipped cream into the cream cheese mixture until fully combined and smooth, maintaining the fluffy texture.
- Prepare Piping Bag: Using a small food-safe paintbrush, paint two red decorative stripes inside a piping bag fitted with a large round tip. Carefully fill the bag with the peppermint cheesecake filling.
- Fill Cookie Cups: Pipe a generous swirl of the peppermint cheesecake filling into the cooled cookie cups evenly.
- Chill to Set: Refrigerate the filled cookie cups for 1 to 2 hours or until the filling is firm and set.
- Garnish and Serve: Sprinkle the tops with chopped candy canes. Serve immediately or keep refrigerated for up to 2 to 3 days. For longer storage, freeze without candy cane topping for up to 4 weeks.
Notes
- For best results, ensure all ingredients like butter and eggs are at room temperature.
- Use full-fat cream cheese for a richer and creamier filling.
- The cookie cups should be soft in the center when removed from the oven as they will firm up while cooling.
- Red gel decoration inside the piping bag adds a festive touch but can be omitted if desired.
- Store leftover cookie cups in an airtight container in the refrigerator to maintain freshness.
- To freeze, omit candy cane topping and add fresh garnish after thawing.
Keywords: Chocolate Peppermint Cookie Cups, peppermint cheesecake cookie cups, holiday desserts, chocolate cookie cups, festive desserts, peppermint cream cheese filling