Orange Creamsicle Mini Cheesecakes Recipe
Introduction
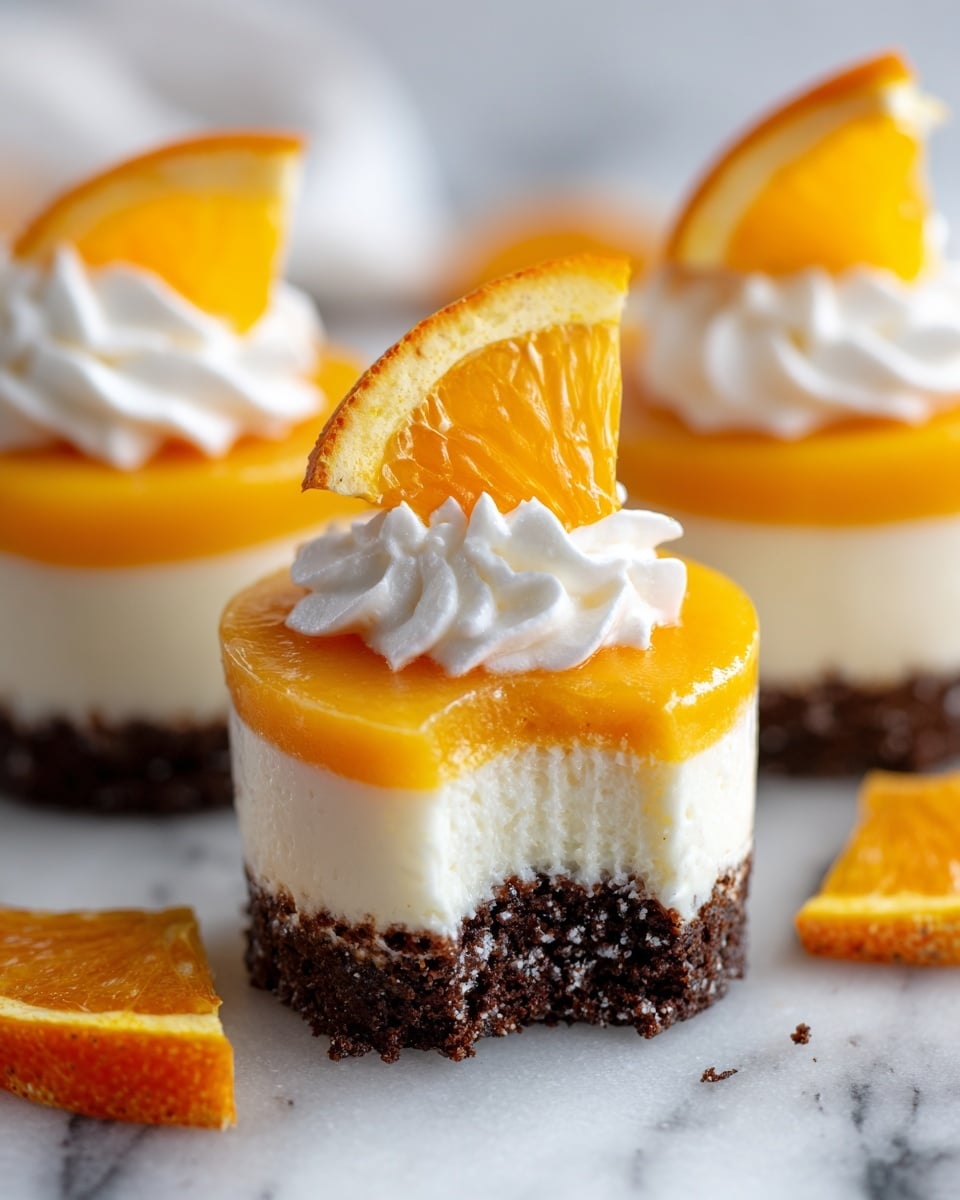
These Orange Creamsicle Mini Cheesecakes offer a delightful blend of creamy cheesecake with a bright, citrusy twist. Perfectly portioned in cupcake liners, they make a fun and elegant treat for any occasion.
Ingredients
- 12 Oreo Cookies
- 16 ounces cream cheese, room temperature
- ½ cup powdered sugar
- 1 teaspoon vanilla extract
- 1 cup heavy whipping cream
- Zest of 1 orange
- ½ teaspoon orange extract
- 2-3 drops orange gel food coloring
- Whipped cream, optional for garnish
- Orange slices, optional for garnish
Instructions
- Step 1: Place 12 cupcake liners in a muffin tin. Add one Oreo cookie to the bottom of each liner and set aside.
- Step 2: In a medium bowl, beat the cream cheese and powdered sugar together until smooth and creamy.
- Step 3: In a separate bowl, whip the heavy cream until soft peaks form. Add the orange extract and continue whipping until stiff peaks form.
- Step 4: Gently fold the cream cheese mixture into the whipped cream on low speed just until combined.
- Step 5: Divide the cheesecake mixture evenly into two separate bowls.
- Step 6: Spread the first half of the mixture evenly over the Oreo bases in each cupcake liner.
- Step 7: To the remaining half of the mixture, add the orange zest and 2-3 drops of orange gel food coloring. Mix gently on low speed until combined.
- Step 8: Carefully spread the orange mixture over the cream cheese layer in each liner. Use a toothpick to gently swirl the two layers together for a marbled effect.
- Step 9: Refrigerate the mini cheesecakes for at least 3-4 hours or overnight to set firmly.
- Step 10: Before serving, garnish each cheesecake with whipped cream and an orange slice if desired.
Tips & Variations
- Use regular vanilla extract instead of orange extract for a classic cream cheese flavor.
- Substitute Oreos with graham crackers for a lighter crust option.
- For a stronger orange taste, add a little fresh orange juice along with the zest.
- Try using food-safe gel coloring in other citrus shades like yellow for a lemon variation.
Storage
Store the mini cheesecakes in an airtight container in the refrigerator for up to 3 days. For best texture and flavor, consume within this period. When ready to serve, you can let them sit at room temperature for 10 minutes to soften slightly. Do not freeze as it may affect the creamy texture.
How to Serve

Serve this delicious recipe with your favorite sides.
FAQs
Can I make these cheesecakes ahead of time?
Yes, these mini cheesecakes can be prepared a day in advance and refrigerated until serving. This allows them to set properly and enhances the flavors.
Can I use regular food coloring instead of gel?
You can use regular food coloring, but gel food coloring provides a more vibrant color without altering the consistency of the cheesecake mixture.
PrintOrange Creamsicle Mini Cheesecakes Recipe

These Orange Creamsicle Mini Cheesecakes are a delightful no-bake dessert featuring a crunchy Oreo cookie crust layered with creamy vanilla and vibrant orange-flavored cheesecake filling. Perfectly swirled and chilled to set, these bite-sized treats capture the nostalgic flavor of a classic creamsicle in a compact, elegant form ideal for parties or anytime indulgence.
- Prep Time: 15 minutes
- Cook Time: 0 minutes
- Total Time: 3 hours 15 minutes (includes chilling time)
- Yield: 12 mini cheesecakes 1x
- Category: Dessert
- Method: No-Cook
- Cuisine: American
Ingredients
For crust:
- 12 Oreo Cookies
For the cheesecake:
- 16 ounce cream cheese, room temperature
- ½ cup powdered sugar
- 1 teaspoon vanilla extract
- 1 cup heavy whipping cream
- Zest of 1 orange
- ½ teaspoon orange extract
- 2–3 drops orange gel food coloring
For garnish:
- Whipped cream, optional
- Orange slices, optional
Instructions
- Prepare Cupcake Liners and Crust: Place 12 cupcake liners in a muffin tin and add one Oreo cookie to the bottom of each liner. Set aside as the base for the mini cheesecakes.
- Make Cream Cheese Mixture: In a medium bowl, blend the room temperature cream cheese with powdered sugar until the mixture is smooth and creamy. This forms the sweet, rich cheesecake base.
- Whip Heavy Cream: In a separate bowl, whip the heavy cream until soft peaks form. Add the orange extract and continue whipping until stiff peaks form, creating a fluffy, flavor-infused cream.
- Combine Cheese Mixture and Whipped Cream: Gently fold the cream cheese mixture into the whipped cream at low speed just until combined to preserve the airy texture.
- Divide Mixture: Split the combined cheesecake mixture evenly into two separate bowls.
- Assemble Vanilla Layer: Spoon the first half of the cheesecake mixture over the Oreo cookie crusts evenly, forming the vanilla-flavored layer.
- Prepare and Add Orange Layer: To the remaining half of the cheesecake mixture, add orange zest and 2-3 drops of orange gel food coloring. Mix gently on low speed to blend the orange flavor and coloring evenly. Spread this orange mixture over the vanilla layer in each cupcake liner.
- Create Swirl Effect: Use a toothpick to gently swirl the orange layer into the vanilla layer to create a marbled creamsicle effect.
- Chill Mini Cheesecakes: Place the assembled mini cheesecakes in the refrigerator and chill for at least 3-4 hours or overnight to allow them to firm up properly.
- Garnish and Serve: Once set, optionally top each mini cheesecake with a dollop of whipped cream and a slice of orange for added decoration and freshness before serving.
Notes
- The Oreo crust can be replaced with graham crackers or digestive biscuits for a different flavor profile.
- For a more intense orange flavor, add a bit more orange extract or zest, but do so carefully to avoid overpowering the cheesecake base.
- Use full-fat cream cheese and heavy whipping cream for the best texture and richness in the cheesecake.
- Ensure cream cheese is at room temperature before mixing to avoid lumps in the filling.
- Swirling the two layers is optional but adds a nice visual appeal that mimics a classic creamsicle.
- Keep the mini cheesecakes refrigerated until serving to maintain firmness and freshness.
Keywords: Orange Creamsicle Cheesecake, Mini Cheesecakes, No-Bake Dessert, Oreo Crust, Orange Dessert, Cream Cheese Dessert